Having a long weekend enables me to get things done that I otherwise wouldn’t have time for. One of the things I’ve wanted to do for a while is create a Virtual Machine with Windows 10 on it, so I can use Windows 10 and also start looking at application development for it. I’m glad to say that I’ve now had the time to create the virtual machine and it went fine. I thought I would write this post to detail the steps I took to create the VM.
You will need to download the Windows 10 Insider Preview ISO which can be found here – You will need to be signed up to the Windows Insider Programme before you can download, but that’s not a lengthy process at all.
Creating the Virtual
I have used VMWare Player Version 7.1.0 build-2496824 to build the Virtual Machine. Follow the steps below and you should end up with a working Windows 10 virtual.
Step 1 – Create New Virtual Machine
From the VMWare Player menu, select Create New Virtual Machine. You will then see a dialog box similar to the one below.

Browse to the location where you saved the ISO file and select it. Then click on Next >. Type in the name you would like to give to the VM and select the location where the VM files will be stored. This should look similar to the settings below.

Again, click Next > to go to the next page of the wizard. This next page allows you to further customise the VM settings. The most I did here was change the amount of RAM given to the VM. I’d recommend giving the VM as much as you can. Obviously, don’t give the VM the same as you have in the host machine.
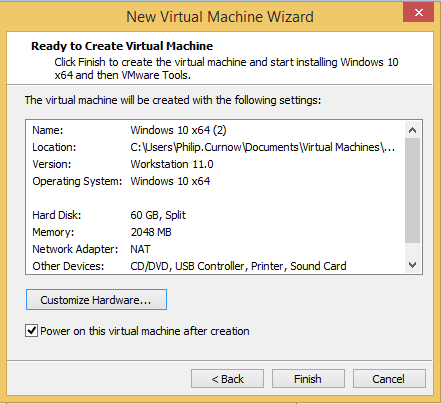
Click on Finish and the VM should start to be created.
Hyper-V Issues
When I first tried to create the VM, I received a VMWare and Hyper-V compatibility error as shown below.

This is easy enough to overcome, just do the following:
- Open Hyper-V Manager and select stop service
- Run a command prompt as an administrator and issue the command bcdedit /set hypervisorlaunchtype off
- Reboot and create the virtual again
To enable Hyper-V simply issue the command bcdedit /set hypervisorlaunchtype auto at the command prompt, again run this as administrator.
When the Windows 10 install starts, you should see similar to the following in VMWare Player.

For me, the install took around 35 to 40 minutes with a couple of reboots. Once the install is done, make sure you install VMWare Tools in the same way as you would for any other Windows VM.
Installed and Running!
You should now have Windows 10 happily installed and running. I’m even writing this post using the VM and the Spartan Browser!

I quite like what I have seen so far. If you have come from Windows 8.1 you should have no problems finding your way around. I think for people who have never used Windows 8.1 it will be a bit of a shock to the system, but maybe not as much as Windows 8 and to a lesser extent 8.1 would have been.
My plan now is to install Visual Studio 2015 and start looking at application development, this really has been my main motivation for creating the virtual.
As you can see, creating a Windows 10 virtual is pretty much the same as any other, the only little gotcha I had was Hyper-V, but this was easily solved. As I start to get into Windows 10 and application development, I’ll blog further about how I am getting on.
I hope you find this post useful, and if you create yourself a virtual I’d really like to hear what you think of Windows 10.
