A couple of evenings ago, I decided to build a Windows 8 64 bit virtual machine with Visual Studio 2012 and the Windows Phone 8 SDK, so I could have a look at writing apps for Windows Phone. The main tool I use for creating and running VM’s is VMWare Player, its free and does exactly what I need. Now, its certainly possible to build a Windows 8 VM through VMWare Player as long as you have Version 5. I downloaded the latest version which is 5.0.2 build-1031769.
I went ahead and built my Windows 8 VM. Installed Visual Studio 2012 which went fine, and then installed Windows Phone 8 SDK. This is where I did have problems, the installation did fail with the usual unfriendly error message we have come to know with some software. After a search on Google, I did find some instructions on how to do this for VMWare Workstation, so thought I would give it a try for VMWare Player, and with a little modification, I’m pleased to say I now have a VM through Player working happily allowing me to test Windows Phone 8 apps through the emulator. I have detailed below exactly what I have done to build the virtual, so if you have had the same problem, following these instructions should sort out your problems.
Make Sure your Host system is good enough
The first thing you need to do is make sure your host system is up to the job. You need to have Hyper V running on your Windows 8 virtual, so your host systems needs to support SLAT – Intel Extended Page Tables. The easiest way to find this out is to use the Coreinfo.exe application. You can download this from the link http://technet.microsoft.com/en-gb/sysinternals/cc835722.aspx. Run a command prompt as administrator and from the directory that has Coreinfo.exe in it, run the command Coreinfo -v. If all goes well, you should see something like the following:
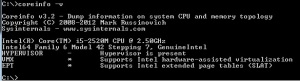
Looking at the last line, if this says Supports Intel extended page tables (SLAT) all is looking good. If SLAT is not supported, don’t continue with this, as I would say it isn’t going to work. Note: The asterisks are important here, if you see a hyphen instead of an asterisk it means the feature is not supported.
Creating the Virtual Machine
Ensure you have VMWare Player V5, as this will allow you to create Windows 8 VM’s. From within VMWare Player, select the option to create a new Virtual Machine, and make sure your dialog looks like the following:

Click Next > and for the Guest Operating System select Windows 8 x64. Click Next > and give your VM a machine name. For the disk capacity, keep whats been offered (60 Gb for the disk size). Click Next > again and then click the Customize Hardware button.
For memory select, select 4 Gb if you can, this is what I have used and is what has been recommended in various posts I have read. Hopefully you will be able to allocate this much space. If you can’t select an amount that you can allow, but bare in mind that you should ideally have 4 Gb as a minimum. An example of this is shown below.

The from the list configuration options, select Processors. Select the number of cores you want to allocate, I have selected 2 and then ensure that the option Virtualize Intel VT-x/EPT or AMD-V.RVI is selected. The screen shot below shows my settings.
 Click Finish to save your new VM. Don’t start your VM yet!!!
Editing the VMX File
Before we carry on and start our VM, we need to edit the vmx file that has just been created. Navigate to where you have saved your VM files and look for the vmx file. Mine was called Windows8VM.vmx but yours will be called whatever you have called your VM. Open the vmx file in an editor like Notepad, and add the following line:
hypervisor.cpuid.v0 = “FALSE”
The v0 is a v and a zero.
My vmx file looks as follows. The added line is circled.

Save your vmx file. We are now ready to start the VM.
Before you start the VM
Before you start the VM, select it in VMWare Player and edit the virtual machine settings. Select the CD/DVD (IDE) settings and for the Connection, either point this to the ISO for Windows 8 or a physical drive. As I’m installing from an ISO, my setting looked as follows:

Click on OK and then start your VM. The Windows 8 installation should then start. When your Windows 8 installation has finished, you will need to install Visual Studio 2012 and then download and install the Windows Phone 8 SDK. You can get the SDK from this link http://dev.windowsphone.com/en-us/downloadsdk.
Conclusion
The above worked for me fine. It’s a mixture of installing for VMWare workstation and a bit of bespoking for VMWare Player through trial and error, hopefully this will work for you too and get you on the road to using the Windows Phone 8 emulator for testing your apps.


