String Search in Scratch

When I originally wrote the custom string blocks for Scratch, I posted a discussion on the ScratchEd site to let people know about them. I received a message a couple of weeks ago about adding a block that allows a string to be searched for a specific string (sub string). This is certainly a useful addition to the library of blocks and one I wanted to add when I had some free time.

Having found myself with the free time this morning, I have implemented a new custom block called FindString. FindString allows you to specify a string to be searched, a string to find and finally the search start character position within the string to be searched. The block is used as follows:

FindStringLooking at the example above, when executed, the block will search the string I like programming in Scratch for the string in starting at the character position 1 within our string to search. The block returns the start position of the string to find in a variable called startsAt. Executing the example will set startsAt to 16, as in starts at character position 16 in our string to search, if the string is not found, startsAt will be set to zero.

This block stops running after it has found the first occurrence of the string to search for. I will explain at the end how to search for more than one occurrence of a string.

How Does It Work?

So, how does the block work? Well, its actually very simple to follow. The image below shows the program code for the block.

Find String BlockWhen I first started writing the block, my first version used two loops (nested loops). The block worked fine, but after looking at the finished block, I realised that it could be re-written to use just one loop, making it a little easier to follow. So, lets break down the block above into logical steps to understand whats going on.

1. As we are doing a charcter by character comparison of the two strings, we need two variables to act as ‘pointers’ into our string to be searched and the string we are searching for. stringPos will hold the current character position in our string to be searched and subPos will hold the character position in the string we are searching for.

2. We initialise the startsAt variable to zero. Remember this variable holds the start position of our string we are searching for when the block has completed.

3. We now loop over the whole of the string to search for character by character, doing the following:

4. We check if the character at position stringPos in our string to be searched is the same as the character at position subPos in our string we are searching for. If they are, we first check if subPos is set to 1, if it is, we want to set startsAt to the value of stringPos, as this could possibly be the start location of our string to search for.

5. We then add 1 to both stringPos and subPos.

6. We next check to see if subPos (remember this is the character position in our string to search for) is equal to the length of our string to search for plus 1 character. If this is the case, we have actually found our string, so we can stop the block executing any further.

7. You may find what has been said in Step 6 confusing, but when we check if the characters from the two strings match in Step 4, if they don’t match, we set subPos back to 1 and add 1 to stringPos. We set subPos back to 1, as we want to continue searching the rest of the string should only a few of the characters of our string to search for has been found.

Its actually quite tricky to clearly explain in words what the block is doing, the best way to understand it is to look at it in Scratch, it really won’t be that hard to follow.

How Can I Search More Than Once Occurrence?

I did say at the beginning of this post that the block will only search for the first occurrence of a string, but what if you want to search for more than one occurrence of the same string? Well its very simple, all we need to do is keep calling the FindString block with a new start position. The easiest way is to do this in a loop and keep calling the block until startsAt equals zero. We will change the start position of each call to the FindString block by the position the last occurrence was found plus 1 character, this ensures we don’t find the same occurrence twice.

I have written a simple example below, that inserts all the positions of the occurrences in a list. The string we are going to search is “My cat likes to eat cat food. He is a happy cat” (I don’t have a cat by the way!). We will search for all the occurrences of the word cat. Shown below is the Scratch code to do this.

Occurrence CodeOnce this code has been run, the Occurances list will look as follows:

Occurrence ListAs you see, searching for multiple occurrences of string is quite a simple process. I hope you find the addition of this block useful and feel free to use it in any way you like.

More Scratch String Custom Blocks

On September 22nd I blogged about a set of custom string blocks I implemented for Scratch. These have been very well received and I am glad people are finding them useful. I did say that I was going to add some more custom blocks to manipulate strings, and I am pleased to say that I have now added four more blocks to the Scratch project. I have now implemented the following blocks:

LTRIM

LTRIM allows you to trim any leading spaces from a string (Left Trim). Using an example, consider the string ”     Scratch” (quotes used to show the spaces). You can pass this string into the LTRIM block and it will remove all the leading spaces, giving you the string “scratch”. You use the block as follows:

LTrim BlockThe trimmed string is stored in the variable result.

RTRIM

RTRIM allows you to trim any trailing spaces from a string (Right Trim). Again using an example where the string is in quotes, if you call the block with the string “Scratch    “ you will receive a string back with the trailing spaces removed. The block is used as follows:

RTrim BlockThe trimmed string is stored in the variable result.

TRIM

TRIM is a combination of LTRIM and RTRIM and will remove any leading and trailing spaces. If you look at the block in Scratch, it shows a good example of being able to reuse exisiting blocks. All TRIM does is call the LTRIM and RTRIM blocks. As an example, if you call the block with the string ”    Scratch    “ all of the leading and trailing spaces are removed. You use the block as follows:

Trim BlockAs with the previous two blocks, the trimmed string is returned in the variable result.

SPLIT

SPLIT is an extremely useful block and in the programming languages I use on a daily basis, it is implemented and I use it often. SPLIT allows you to split a string at a certain character. A simple example of this is splitting a sentence into individual strings. If we passed in the string “I like programming in Scratch” and tell it to split on spaces, the SPLIT block will split this into indiviudal strings as follows:

I
like
programming
in
Scratch

I very often have to write programs that work with comma seperated values (CSV). In my programs, I would read a line of data from a file that could look like “phil curnow,11/04/1972,41” – This just shows a simple line with my name, date of birth and age. Now, using my language of choice, which is C#, if I wanted to display each of these values on screen, I could write some program code that looks like this:

string str = “phil curnow,11/04/1972,41”;

foreach (string s in str.Split(‘,’))
    Console.WriteLine(s);

This would print each of the three items on a seperate line on the screen. All I am saying in the program is that I want to split the string wherever there is a comma.

So how can we implement this in Scratch? Well, this is where lists come in to play. If we pass a string into our custom block and tell it to split on a space, each of the ‘sub-strings’ can be added to a list, and this is exactly how I have implemented the block.

To call our custom block, we need to supply two parameters, the string we want to split and the character we want to split on. So, looking at the example below, we will pass in the string I like programming in Scratch and the second parameter, although looks blank, is a space.

Split BlockAll our sub-strings are added to a list called SplitList and once the block has been executed, SplitList looks as follows:

SplitListUsing my example of the CSV list, we could pass in the string phil curnow,11/04/1972,41 into the block as follows:

Split Block CSVAnd our SplitList list would then contain:

CSV Split ListAs you can see SPLIT is a very powerful and above all, useful block to have.

Do you want to see anymore string blocks?

We now have several very useful custom blocks to manipulate strings in our Scratch projects. Are there any other blocks you would like to see for manipulating strings? If you can think of any other blocks, leave a comment on here or drop me a tweet and time permitting, I will see if I can implement it for you.


How the Scratch Custom Upper and Lower case blocks work

Last week I wrote a post about the custom string handling blocks I have written for Scratch. These have been very well received and I have had quite a few positive tweets back about them. I’m glad people are finding them useful!

Two of the blocks I have written allow you to convert a string to either upper or lower case. Now Scratch 2 when dealing with strings or characters is case insensitive, by this I mean if you perform a comparison of A = a Scratch will evaluate these to be the same. To clarify this, lets look at the block of code below.

Character ComparisonIf you run this block, you will see that the variable result is set to 1. This is what I mean when I say case insensitive, we may consider that A is not the same as a. So what does this have to do with converting our string to upper or lower case? Well, I’ll cover this a little later and you will see how this case insensitivity can help us!

ASCII Codes

If I was asked to write a very basic case changing method (same as a block in Scratch) in say C# (which is my preferred language), I may well consider looking at ASCII codes for characters, this is ignoring the fact that there is already two methods available in the .NET Framework to convert between upper and lower case!!. What is ASCII? well, I’m not going into the depths of explaining this here, but if you look at the Wikipedia entry for it at http://en.wikipedia.org/wiki/ASCII this will give you a full overview of it. ASCII codes can be our friend here for converting between case, if you consider the ASCII code for A is 65 (decimal) and the ASCII code for a is 97 (decimal), you can see there is a difference in the code values of 32. This works for B/b and C/c, etc.

So a method to convert upper case to lower case could loop over all the characters in a string and check the ASCII value for it. If the value is between 65 and  90, (A to Z), we can consider it to be an upper case letter, if we then add 32 to the ASCII value, this will give us the lower case version. We want to range check the letter value to ensure we are working with an upper case letter, otherwise the resulting string would look a little strange.

The small C# method below is something that will convert upper to lower case. Now at this point any C# programmer looking at the method would probably pick it to pieces and to be honest I can too. If I was going to write a version for production code it would be vastly different to this. This method has been written to explain my points above and nothing more.

string ToLowerCase(string str)
{
    string result = String.Empty;

    for (int loop = 0; loop < str.Length; loop++)
    {
        if ((int)str[loop] >= 65 && (int)str[loop] <= 90)
            result += Convert.ToChar((int)str[loop] + 32);
        else
            result += str[loop];
    }

    return result;
}

Passing the string abcd&ABCD to this method would return the string abcd&abcd. Great! we have a working conversion routine. So lets go and implement this in Scratch.

Our Scratch Version

Right, so now we know we can work with the ASCII codes for letters, we just convert what we have above to the corresponding Scratch code, right? …. Well, no we don’t sadly. Scratch does not give us the ability to work with the ASCII codes for letters, so this method will not work. Great! so how can we do this then? Well, remember I explained at the beginning of this post that Scratch is case insensitive and it can be our friend, well this is where it becomes our best friend!

When I was implementing my string blocks, I really did think that case conversion had to be included, so with a little thought figured there must be a way of doing this. The trick with solving any problem like this is to have a look at what we have to work with in Scratch. Whilst the C# method is very nice, we have to throw most of it away and think again. My eureka moment came when I thought about lists. My thinking here when converting to lower case was as follows:

1. Have a list that contains all the lower case letters a through to z
2. Loop through every character in our string and see if it exists in our list
3. If it exists, use the character found in the list (which will be the lower case character)
4. If it is not found in the list, use the original character.

So, putting this together, I generated a list called LowerCase which looks like this:

Lowercase ListThis method will work even if we pass over lowercase letters, we will still get our character from the list, which will be lower case. So, my Scratch ToLowerCase block looks like this:

ToLowerCase BlockOur block starts by initialising a couple of variables. result will hold our converted string and charCount is used by the repeat block to loop through every character in our string. I have then implemented another custom block called GetLowerCaseLetter. Splitting out code like this into another block makes the code more readable and also gives us yet another block that allows us to do single character conversion. Our GetLowerCaseLetter block looks in our list and finds the lower case letter we need. After calling this block, our lower case letter is held in the variable letterResult so we simply add this to our result variable. We then add 1 to the character count and go around the loop again. This keeps going until we have worked with every character in our string.

The GetLowerCaseLetter Block

This is where most of the work is done. Lets have a look at this block.

GetLowerCaseLetter BlockAgain at the beginning we initialist a couple of variables. loop is used to loop through our LowerCase list. letterResult is used to return our converted character. We are then going to loop through the list a maximum of 26 times (remember a to z!!). When we are in the loop, we check if the letter we have passed to the block, e.g. A is in our list. So using a simple if block we are essentially saying if A = a then set letterResult to the item found in our list, which will be a. As we don’t want to go around the loop again, we stop this script. At this point letterResult holds a which is the lower case version of what we passed in. If we had passed in a it would have found this and letterResult would hold a.

If our block has got as far as the end of the loop, we have another if block that says if letterResult is empty, we must have passed in a character other than a letter of the alphabet, so just simply return it. This ensures anything like %&*() is still kept in the converted string.

So putting this to the test, if we use the block like this:

Call ToLowerCaseThe string we will get back is abcd&abcd, which is the lower case version of what we passed in!

Converting to Upper Case

Converting to upper case is exactly the same, we just use a list that contains upper case A to Z. If you look at the ToUpperCase block in the Scratch project, you will see it is exactly the same as its lower case version. The GetUpperCaseLetter block again is exactly the same as its lower case version.

So, again as you can see, whilst our Scratch version of converting to upper and lower case is very different to what we may do in other programming languages, if you sit back and think about the problem and consider what you have to work with in Scratch, there is generally always a way of implementing what you want to do.

Scratch Custom String Blocks

Having the ability to manipulate strings is one of the most powerful facilities you can have in a programming language. In my day to day coding I manipulate strings an awful lot. You may want to be able to get specific characters in a string, convert the whole string to uppercase characters or lowercase characters. Many years ago, one of the first programming languages I learnt was BASIC (http://en.wikipedia.org/wiki/BASIC). BASIC has several functions for allowing you to manipulate strings, for example:

LEFT$(string, n)

LEFT$ allows you to return the LEFT most n characters from your string. For example if you use the command PRINT LEFT$(“Scratch”,3) the letters Scr would be printed to the screen. The n parameter tells the function how many characters starting at the beginning of the string you want.

RIGHT$(string, n)

Similar to LEFT$, RIGHT$ allows you to return the RIGHT most n characters from your string. So something like PRINT RIGHT$(“Scratch”, 3) would print tch to the screen. The n parameter tells the function how many characters starting at the end of the string and working backwards you want.

MID$(string, start, n)

MID$ is quite a powerful function. It allows you to get a certain amount of characters, but starting at any point in the string. So using a command like PRINT MID$(“Scratch Programming”, 9, 7) would print Program to the screen. The start parameter tells the function where you want to start in the string and the n parameter tells the function how many characters you want to return from the starting point.

UPPER$ and LOWER$

Some other functions available are UPPER$ and LOWER$. These return either an uppercase or lowercase version of your string. So something like PRINT UPPER$(“scratch”) would print SCRATCH and PRINT LOWER$(“SCRATCH”) would print scratch. Again, very useful!

How can we do this in Scratch?

Out of the box, Scratch does not have these kind of blocks built in. As we know, Scratch 2 allows us to write our own custom blocks, so we could write our own versions of these. What I have done is build versions of the functions explained above as custom blocks that can be used in your Scratch programs.

I have made these available at http://scratch.mit.edu/projects/12402145/. If you look inside the project, all the custom blocks are defined on the stage, with an example of how you would use each block next to the block definition. I will given an explanation below on how you would use each custom block.

Please Note: The resulting string from each of these blocks is stored in a variable called ‘result’.

Scratch LEFT$

This has been implemented as a custom block called Left. You would use the block like this:

Scratch Left BlockThe first parameter is the string or the variable holding the string you want to work with. The second parameter is the number of characters from the left you want. The result is stored in a variable called result. Looking at the example above, after calling this block, the result variable would hold Scr.

Scratch RIGHT$

This has been implemented as a custom block called Right. You would use the block like this:

Scratch Right BlockThe first parameter is the string or variable holding the string you want to work with. The second parameter is the number of characters from the right that you want. The result is stored in a variable called result. Looking at the example above, after calling this block, the result variable would hold tch.

Scratch MID$

This has been implemented as a custom block called Mid. You would use the block like this:

Scratch Mid BlockWe have three parameters that we have to supply to this block. The first parameter is the string or variable holding the string you want to work with. The second parameter is where you want to start in the string. The final parameter is the number of characters you want to get from the string. The result is stored in a variable called result. So, looking at the example call above, we can see that we will be working with the string Scratch Programming and we want to start returning characters from the 9th character in the string and that we want to return 7 characters. Starting at the 9th character (P) we will get 7 characters, which will give us the string Program.

Scratch UPPER$ and LOWER$

I have also implemented blocks that allow strings to be converted to upper of lower case. These blocks are called ToUpperCase and ToLowerCase. As with all the other blocks, the result is stored in a variabled called result. You would use the blocks like this:

Scratch ToUpperCase BlockScratch ToLowerCase BlockCalling the ToUpperCase block on the string shown would convert it to SCRATCH and calling the ToLowerCase block on the string shown would convert it to scratch. If you supplied a string such as ScRaTcH to either of these blocks, it will still work as expected.

I am going to write a further blog post on how the ToUpperCase and ToLowerCase blocks work, because Scratch is a little different to most languages when comparing upper and lower case characters. The code for the other blocks is fairly easy to follow and figure out whats going on.

Anymore Blocks?

I will be implementing more string manipulation blocks over a period of time. The blocks I want to implement next are:

  – SPLIT(string, char)
  – LTRIM(string)
  – RTRIM(string)
  – TRIM(string)

SPLIT enables you to split one string into several strings, splitting the string at a specific character. For example if you supplied a string I Program In Scratch and told the block to split on the space character, you would end up with 4 strings containing:

  I
  Program
  In
  Scratch

Each of these strings would be held in a list.

LTRIM and RTRIM removes all spaces to either the left or the right of a string. So if you had a string ”    Scratch” (quotes used to show the spaces) and passed the string to the LTRIM block, it would remove all the leading spaces. Similarly, if you had the string “Scratch   ” and passed the string to the RTRIM block, it would remove all the trailing spaces. TRIM performs a union of LTRIM and RTRIM and will remove all leading and trailing spaces.

As these blocks are added, I will add a post to this blog and will also add a comment in the Scratch forums and on the ScratchEd web site.

Use and Share!

I do hope that you find these blocks useful and feel free to use and modify them in any way you would like. Share them around with your fellow Scratchers.

Recursion in Scratch 2

With the release of Scratch 2 came the ability to create your own blocks, which in programming terms is the ability to create your own procedures or methods. One thing you can’t do with custom blocks is to return values from any computation performed in your block. You need to assign the result of any computation to a variable.

In this post we are going to look at recursion. The first question you may ask is “what is recursion?” — Simply put, recursion is the ability for a function/method (I tend to use the term method, but in the context of this post, they mean the same thing) to call itself. Now, with the advent of custom blocks in Scratch, recursion becomes possible. Before custom blocks, a form of recursion was possible in Scratch using broadcast blocks. There is a complete article on the Scratch Wiki about recursion, and I would recommend you read it. it can be found at http://wiki.scratch.mit.edu/wiki/Recursion.

So, first, lets have a simple recursion example. Consider you want to be able to count backwards from a specific number down to 1, easy, just use a loop, and to be honest that would be the best way to do this, but this simple example does give a good, simple introduction to recursion. First, lets have a look at how we would do this in a loop, defining a custom block.

Count Loop

We can then call this by simply using the CountLoop block and providing a parameter, say 10, and this will count down from 10 to 0, nothing particularly difficult here. Now consider the version below.

Recursive Count
The first thing to notice is that there is quite a lot less ‘code’ in this version. The second thing to notice is the last line in the IF block, our block is calling itself, and this is where the recursion happens. So, consider what happens when we first call the block, this is what happens:

1. We call the block with the parameter 10
2. The IF block checks if the value passed in is greater than 0. If it is, we display the value of n.
3. After displaying the value, we call the block again, using the value of the parameter that was originally passed in (10) minus 1. So the block is called with the value 9, and the whole process starts again.

This will continue to happen until the value passed in is 0 and then it will end.

Base Case

The IF block in our recursive block is very important. In programming terms, this is called the base case. The base case determines when the recursion will end. If there was no base case, the block would call itself forever, the same as an infinite loop (think forever block!).

Recursive Case

The opposite to the base case, is the recursive case. The recursive case is what happens when the base case has not been satisfied, in our example, its what happens within the IF block.

A More Realistic Example

Whilst the example above was perfectly valid to introduce the concept of recursion, you would usually use the loop construct to achieve the desired result. Lets look at something more valid. Very often, recursion examples use calculating the Fibonacci Sequence as an example. I’m not going to use this, I am going to use the calculating the factorial of a number, this lends itself well to explaining issues with recursion and also lends itself well to explaining an issue with recursion in Scratch 2.

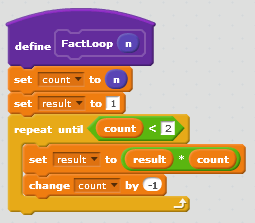
Calculating the factorial of a number is easy, its the product of all the numbers (positive numbers) less than or equal to the number you provide. So the factorial of 5 is equal to 5x4x3x2x1, which equals 120, so the factorial of 5 is 120. So first how would we use a loop in Scratch to calculate the factorial of a number. Well we could do the following:

Factorial Loop
A fairly simple piece of code to calculate the factorial of a number. You will see if you call this block with the parameter 5, the variable result will contain 120, which is what we want. So, how do we do this recursively? Before I explain how to do this in Scratch 2, I want to move on to a little bit of programming theory, stick with me here, hopefully this won’t be too bad!!

If I was asked to implement a recursive factorial method in a programming language of my choice, I would use C# (designed and developed by Microsoft and part of the .NET Framework). I’ve used many languages over the years, but all my coding now (both home projects and work) is mainly in C#. This code will be easy to understand, so don’t worry. So, how could I implement this in C#, well I could do the following (for any programmers looking at the method below, you probably would replace the int with a long):

public int factorial(int n)
{

    if(n <= 1)
        return 1;
    else
        return n * factorial(n – 1);
}

We can then use the method as follows int result = factorial(5); and you should get the answer 120.

Right, so how does this work ‘under the covers’ when the method is called. Firstly, unlike Scratch, we can return values from our method, and this is a blessing, but in recursion, it can also be a nightmare. When a program is running and a method is called, it needs to know where to return back to when the method call has completed. An area of memory called the stack is used to hold this information. With recursion, each time the method calls itself, information is saved on the stack, so when the call finishes, it knows where to go back to. The stack is not infinite in size, so if you make a large amount of calls, the stack can become full up and you will get an error. When using C# (or any other language for the .NET Framework), you will receive StackOverflowException and you then have to go and fix this. I can remember having to fix someone elses recursive method where the stack was getting full up and it was a nightmare, the method was huge and there was no real documentation on what was going on. The eaasiest thing to do was to refactor the code to use a loop as there was no real need for it to be recursive. To show an example of what happens when the recursive method above runs, under the covers something like the following is happening when you calculate the factorial of 5:

1. factorial(5)
2. 5 * factorial(4)
3. 5 * 4 * factorial(3)
4. 5 * 4 * 3 * factorial(2)
5. 5 * 4 * 3 * 2 * factorial(1)
6.                                   returns 1
7                    returns 2 * 1 = 2
8.                 returns 3 * 2 = 6
9.             returns 4 * 6 = 24
10.    returns 5 * 24 = 120

As you can see, there is a lot going on here to calculate. The reason this is happening is because of this line of code in the method: return n * factorial(n – 1); The factorial method is being recursively called, but we also need to multiply the result of the recursive call by the previous value of n. You can see how this could cause stack problems should you wish to calculate the factorial of a large number. So, whats the recursive alternative? Well, there is an alternative, its called tail recursion and this is the type of recursion that you would ideally need to implement in Scratch 2 to recursively calculate the factorial of a number, as we have no version of the return statement in Scratch. Tail recursion may sound complicated, but to be honest, its an awful lot easier to understand whats going on than the example above.

Tail Recursion

A method is said to be tail recursive, when the last action performed by the method is to simply call itself. Looking at our example above, the recursive call is not the last action, the multiplication of the call to the method is the last action, so to be tail recursive, the last action needs to be factorial(n-1). How can we do this? Well, what we need to do is actually perform the multiplication in our method and return this back each time we call, so we need to keep a running total. Going back to my roots in assembly language programming, I’ll call this an accumulator. So we would have another parameter in our factorial method, so the declaration of the method would be int factorial(int n, int accumulator). Our method would then look like this:

int factorial(int n, int accumulator)
{
     if(n<2)
         return accumulator;
     else
         factorial(n-1, n*accumulator);
}

We would then call our method like this factorial(5, 1); You see that when we call the factorial method each time, we are sending over the result of the previous calculation. The benefit of this in languages such as C# is that the stack does not get filled up, essentally ‘under the covers’ the following happens:

1. factorial(5, 1)
2. factorial(4, 5)
3. factorial(3, 20)
4. factorial(2, 60)
5. factorial(1, 120);
6. returns 120

And because our base case says if the value of n passed in is less than 2, we return the value of accumulator, which will be 120, which is the factorial of 5. I’m sure you will agree, this looks an awful lot easier to understand than the first version!!

How do we do this in Scratch?

Some of you may be saying, well this still implements a return, how can we do this in Scratch. Well, with the single return, to do this in Scratch we would just assign the value of accumulator to a variable, as this is done in the base case, so there is nothing else needed to be done in the recursive method. So here goes, here is the recursive block that implements the tail recursive version of our method.

Recursive Factorial
As you can see, the only difference between our Scratch version and the C# version is that when the base case condition is met, we assign the result to a variable and not return it.

Conclusion

If you have got this far reading, thanks for sticking with it!! Recursion is interesting and one worth learning. As you can see, there are always ways of getting around issues with Scratch, and this also demonstrates the power of some of the new features of Scratch 2.

I have put together all the Scratch code used in the post into a Scratch solution that you can go and have a look at it. Should you find it useful feel free to use the code in your programs or teaching. The link to the solution is http://scratch.mit.edu/projects/11610916/

Lists in Scratch 2

Scratch ListsVariables in Scratch allow us to store a single piece of data that we can use in our scripts. This blog post will introduce Lists (also known as arrays in other programming languages). Where variables allow us to store a single piece of information, lists allow us to store multiple pieces of information in the same way we would make a list of items on a sheet of paper. One of the most common lists we make in our lives is a shopping list, and I will use the idea of a shopping list to explain the concept of Scratch lists.

When we write a list on paper, we very often add items to the list from top to bottom, i.e. we add item 1, then item 2, etc. We can do this with lists in Scratch, and we can also insert items at a specific location in the list, remove items from a list, etc. In this post we will cover all the actions you can perform on a list. Code blocks will also be given to show exactly how you express this in the Scratch environment.

Creating a List

To create a list in Scratch, from the Block palette select Data and then click the Make a List button, give your list a name and then click OK, an empty list is then displayed on the Stage. At this point you are then ready to start adding items to your list. In all the example code blocks in this post, the list will be called ShoppingList.

Adding Items

To add an item to our list, we use the add block, which looks like:

Add Block
Where we see the word thing, we replace this with the word, number or sentence we want to add to the list. Looking at the picture of the list at the beginning of this post, we can see the first item in the list is Apples, so we replace thing with Apples, and we then have our first item in the list. If we then add another item, say Oranges, you will see that this is added to the bottom of the list. As we keep adding, the list grows. In programming terms, a list is dynamic in size, meaning it is not a fixed length.

As we are building a shopping list, we want to be able to add many items to it. The code block below allows this to happen. All the code is doing is repeating a block of code asking the user what they want to add to the list. If the user enters the word finish the code block stops.

Adding to a ListInserting Items

So, as we can see its very easy to add items to the end of a list. What about if we want to insert an item within our list? Well this is very easy to do by using the insert block. The insert block allows us to specify what we want to insert and the position in the list where we would like to insert it. If you click on the drop down on the insert block, you will see by default the options 1, last and random. Selecting 1 will insert the item at position 1 in the list, moving the current items in the list down by 1 position (so the current item 1 becomes item 2, etc), last will insert at the end of the list (the same as adding) and random will insert into a random position in the list. We are able to specify the exact position in the list we would like to insert our item. The code block below shows an example of inserting into a list.

List Insert
We simply specify what we would like to insert into the list and the position we would like to insert to. So, using the example of our list at the beginning of this post, if we inserted Milk at position 3, our list would then look like:

1. Apples
2. Oranges
3. Milk
4. Grapes
5. Bread
6. Cheese

As you can see, everything that was in position 3 onwards in the list has now moved down one position.

Deleting from a List

Deleting, or removing items from a list is achieved by using the delete block. You specify the item number you want to delete from the list. By default, the drop down in the block contains 1, last and all, but you can replace this with your required item number. the option all will delete every item from your list (essentially emptying the list), and this is something I would recommend that you do before at the beginning of your scripts. Generally you will always want your scripts to work with an empty list. The code block below shows how to delete an item from a list.

List DeleteReplacing items in a List

A nice feature provided in Scratch is the ability to replace an item in a list with something else. This is basically the same as performing the following two things:

1. Remove an item at a specific position
2. Insert an item at a specific position

The replace does this for us using the replace block. We simply provide the replace block with the location of the item in the list we wish to replace, and the item to replace it with. For example, again if we use our list given at the beginning of this post and we could replace Oranges at position 2 with Pears by simply using the block:

Replace Block
A slightly more complete script block could be as follows:

List ReplaceWhat else can we do with a List?

So, we have covered Inserting, Adding, deleting and Replacing items in a list, what else can we do? There are three more important things we can do with a list, these are:

1. Get an item at a specific position
2. Get the length of a list
3. Search a list for an item

Again, as with all the other list functions, there are blocks that allow us to do the three things. Lets have a look at these in order.

Getting an item at a specific position

Say we want to display an item at a specific position in the list, we use the item block. With this block, we specify the position of the item we want to return and this can then be stored in a variable or you can display it, etc. For our example we will display item number 3 (Grapes in our original list). To do this, we can use the following code block:

List ItemGetting the length of a list

As I’ve already mentioned, the size of a list is dynamic, meaning that the more you add, the bigger it becomes and there will come a time when you want to find out just how long your list is. You can find out the length of your list by using the length of block. In the same way you can return an item in a list to a variable, you can return the length of your list to a variable or again, display it. So, to display the length of our shopping list, we could use the following code block:

Length OfSearch a list for an item

Finally, we can search a list for an item. As you can imagine this is a very useful thing to be able to do. You can do this by using the contains block. The code block below, shows an very simple example of searching for an item in your list.

List ContainsConclusion

This has been a brief introduction to using lists in Scratch. I do hope you find it useful. Feel free to comment on this, use it in your teaching or any way you see fit.

I have produced a very simple Scratch project that was built to help write this post. The link for this is http://scratch.mit.edu/projects/11152013/